Saturday 31 March 2018

New 20mm War Games Friendly Models

NEW Wargames Friendly models by Wee Friends.
These models are 1/72nd scale or 20mm compatible.

WGF20020. British M3 Lee Burma @ £10.00 each.

Next is the
WGF20021 British M3 Grant Canal.Defense Light @ £10.00

Then WGF20022 IDF M51 Sherman on the large hatch welded M4A3 hull with HVVS Suspension @ ,£10.00 each

I will also be doing the IDF M50 Sherman on the large hatch M4A3 hull.
Pack deal is any three WGF vehicles for £27.00
P&P will be £4.00 for 1-6 models 2nd class recorded.
To order vi email to friendshipmodels@btinternet.com.

Sunday 25 March 2018

Lets start today of with some more Wee Friends. Wargames Friendly Vehicles

First up is the M113
 
WFG20006 (1.72nd scale) US. Army M113 APC.

Resin kits can contain Airbubbles, 

The hull is a one piece  Polyurethane resin casting with the wheels and tracks cast in situ, the trim vane, hatches and rear ramp are all supplied as separate cast resin parts with the 0.50 cal mg supplied in white metal.

The blue  spot on the side of the hull shows where a airbubble was filled in.

First go over the area with Sharpie (use a non permanent one) pen in this case Blue.

Then fill the airbubble with super glue and dust with either baking powder or talcum powder  to set the super glue instantly.

Sand under water using the sanding sticks that I described how to make earlier on in the blog, use the pen marking as a guide.

When the pen mark have been sanded off the surrounding area the superglue has been sanded back to the surface of the model.

Prime the area to double check your work and if necessary do the process again.

WFG20003 Canadian Ram Badger Flame Thrower


WFG20004 US/British M4A1 Sherman Mid production.


 WFG20015 M3 Lee Medium Tank (with desert side skirts)


WFG20016 M3 Grant Medium Tank (with desert side skirts)


 That,s all for now folkes


Saturday 24 March 2018

Some notes on safely sanding resin.
 Sanding sticks

The above photo shows a simple inexpensive home made sanding stick.

1, on the smooth or plain paper side of sand paper press down a strip of double sided sellotape

2, Press one to sellotape Coffee stirrer sticks until the whole width of the double sided sellotape is covered.

3, cut between the stirrer stick to free the sanding sticks.

These simple sanding sticks are ideal for any number of sanding jobs, the wisths and shapes can be altered to suit a particular need.

Always use them wet and once clogged simply was them to remove any build up of sanded material, then dispose of them into a old food bag and out into the house hold rubbish bin.


In the above photo is shown a simple and effective wet sanding set up.
it is made from a plastic rake away food container that is used upside down. so you are sanding in the lid of the container.

Simply add  oblong shaped piece of suitable sand paper soak with water and sand the required part. if required top up the water.

If for any reason you have to leave the sanding simply pop the food container base or tray onto the lib to help stop the sanded material drying out and allowing dust to get into the rooms atmosphere.

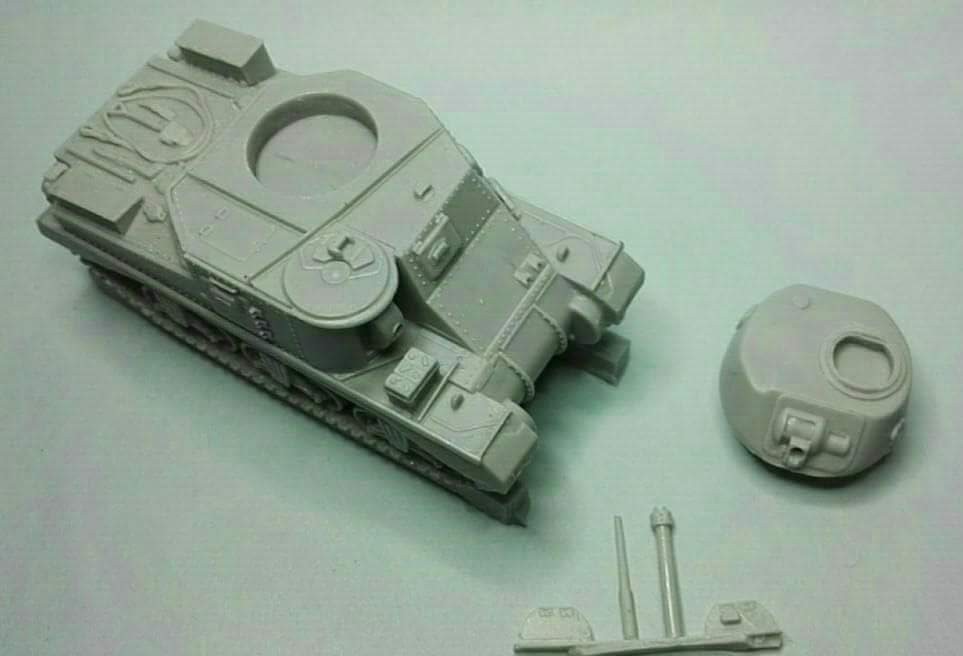
The model in the photo is a Wee Friends Wargames Friendly Vehicle1/72nd scale or 20mm  M4A3E2 Jumbo which I am sanding the casting block or under the turret and tracks. to keep the surface level keep checking and rotate how you hod the pice. and always sand in a figure of eight holding the piece lightly.

The casting blocks under the track units are about 10mm thick.


In this photo the two models of the Jumbo in behind the sanding lid generated the amount of resin slurry contained with in the lid.


Without the sand paper and most of the water has been drained away you are left with this pile of sanding slurry, if this had been dry sanded all of this would have been floating around the rooms atmosphere. This dust is dangerous and should not be inhaled by you, your family of pets.

A selection of photos of the two M4A3E2 Jumbos with the 75mm and 76mm guns. smaller fittings are supplied in white metal.


The same two models now with a coat of Halford,s spray can grey primer.


Thats all for today.

Cheers

Ian


1/48th scale Bishop.

My next new post for today is a photo of the test casting of the Friendship Models soon to be released 1/48th scale full resin Bishop 25 pdr self propelled gun and No 27 Artillery limber, under my Wee Friends Label.
Here as promised is my next update. I have taken the main gun barrel from a second Revell Bradley kit I had in the stash. I have painted the gun barrel a slightly different colour to simulate a new replacement gun on the vehicle. I may still alter the colour with some washes once it has dried for a couple of days.

24.03.2018 update

Its been a very very long time since I last updated this blog. In truth I had forgotten all about it until chatting at a friends house about our local model clubs blog. I remembered having one and was surprised that it was still active. Now a days I like a lot of people have moved over to using Facebook. Where I host a few different modelling pages. As not everyone is on facebook I have decided to try and keep this blog updated as well as the FB pages. My last update back in 2011, was for the 1/72nd scale Revell M2 Bradley APC. I eventually got round to painting the Legend stowage set. Over the intervening years the kit has been displayed at numerous shows up and down the country and has suffered some slight damage in the form of a missing gun barrel. The model was on my shelf awaiting repair. I have photographed the model this morning to show its current condition before repair.
My next update will be once the model has been repaired.